Feeds:
Posts
Comments

Archive for the ‘Dessert’ Category

Apple Upside Down Cake

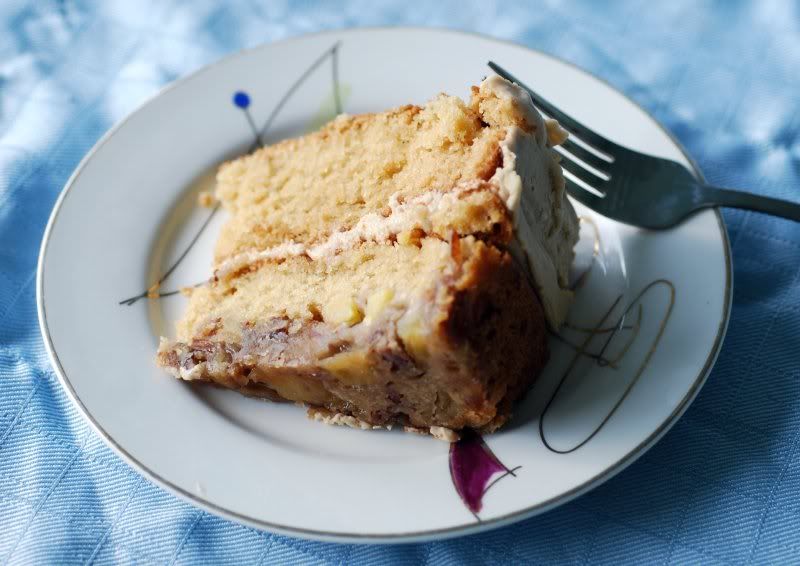
To celebrate this first weekend of October, I decided to use some of the apples that have been sitting in a bowl on our counter and turn them into something sweet and autumnal.  This dessert is a play on the ubiquitous dessert made with the most well known of Hawaii’s produce: the pineapple upside down cake.

For this dessert, I made an apple cider cake.  Genuine apple cider, like the type I was accustomed to drinking every fall as a kid growing up in Pennsylvania, is very hard to come by in the islands, so instead of traditional apple cider I used Reed’s Natural Sparkling Spiced Apple Cider.  I am a big fan of Reed’s ginger drinks, and I have found that their apple cider is pretty tasty.

I have not baked with a sparkling or carbonated beverage before, so this was an experiment in baking, of sorts.  One of the cake layers came out of the oven with a small puka (hole) in it, which I attributed to some carbonation escaping during baking.  Regardless of the puka, the cake turned out deliciously – I was really, really pleased with it.  So was everyone who had it after dinner last night.

Crater Cake!

I am really happy to be back to blogging, and am happy that this is my recipe to return with.  This past year has been one in which I have struggled to find balance in all aspects of my life: meeting the high expectations I have for myself in my work, finding time for play (stand up paddle boarding, free diving, hiking, camping, traveling, reading, enjoying  movies …), healthy living (making food at home, exercise, mindfulness ….), and creative pursuits (cooking, photography, fabric crafts, crocheting, writing, teaching myself to play the ukulele…).  Several things, including this blog, fell off of my plate.

In the past few months, Dan and I have moved (a very short move, but into a much bigger place), inherited a very sweet 13 year old puppy, have both been promoted at work and are taking on greater challenges, and have set new goals for ourselves.  We find ourselves very immersed with our jobs, but we feel so fortunate to be able to do the work that we do, to work in such a fantastic place, and to work with the creative and hard working people that we get to work with.  I hope that each of you experience the same joys and challenges in your work, as well.  Those new goals of ours, though, revolve around balance – and hence I am happily returning to many of the activities that I love.

It’s good to be back.

Now, let us all eat cake.

Apple Upside Down Cake

Cake

2½ cups flour

3 tbsp cornstarch

1½ tsp baking powder

1 tsp baking soda

½ tsp salt

1 cup Earth Balance “butter”

1 cup sugar

½ cup brown sugar

1  cup vanilla soy milk

2 tsp apple cider vinegar

1 tbsp vanilla extract

¾ cup apple cider

Apple Mixture

 2½ apples, peeled and diced

1 cup pecans, chopped

¾ cup flour

¼ cup brown sugar

¼ tsp salt

2 tbsp honey or agave (I almost always use agave instead of honey, and I wholly respect that many vegans would never touch the stuff, but in this case I did choose to use locally sourced honey.  I felt compelled to clarify due to a comment left in regards to honey’s inclusion in the recipe.)

2 tbsp maple syrup

2 tbsp butter, melted

Naked Apples!

1. Preheat the oven to 350 F.

2.Cream together the Earth Balance and sugars until light and fluffy.


3. Mix together the soy milk and apple cider vinegar, set aside.

4. Sift together all dry ingredients into a second mixing bowl.

5. Add vanilla to butter mixture and mix until incorporated.

6. To the butter mixture, add the following: a third of the dry mixture, then the soy milk mixture, another third of the dry mixture then the apple cider, and, finally, the rest of the dry ingredients.  Mix until well combined.

7. Combine all of the apple mixture ingredients into a separate bowl and stir well to combine.

8. Spray the cake pans with oil.  Place parchment paper in the bottom of one, and then layer in the apple mixture on top of the paper.

9. Pour the cake batter into the pans, using less in the pan with the apple mixture.

10. Bake for 40-45 minutes, or until a toothpick inserted into each cake comes away clean.

11. Let the pans cool on a rack for 10 minutes.  Lightly run a butter knife around the edge of the cakes, turn out, and let cool completely.

12. Run a serrated knife along the edge of the cake layer without the apple mixture to remove the crunchy edge.  Apply a thin layer of frosting (recipe follows) to the sides and top of this layer, reserving a bit of the frosting for finishing the cake.

13. Place the layer with the apple mixture on top of the frosted layer.  Use the reserved frosting to fill in the edge between the two layers.  Slice, serve, and enjoy!

Brown Sugar Frosting

Adapted from this recipe

 5 tbsp Earth Balance butter

½ cup brown sugar

3 tbsp vanilla soy milk

1¾ cups powdered sugar

½ tsp vanilla

1. Melt the butter in a small pan over medium heat.  Stir in the brown sugar and stir until melted. Add the soy milk, bring to a boil, then remove from heat.

2. Place the EB butter mixture into a mixing bowl, then mix in the powdered sugar and vanilla.  Mix until well combined.  If the frosting appears thin, add in more powdered sugar.

Read Full Post »


Repeat after me:  this is not a health food.

Despite it being a breakfast food, this is not the type of thing that rings a golden halo of healthy smugness over your head as, say, a bowl of bran cereal or a tall glass of fresh pressed green juice would.  It is exactly the type of thing, however, that will have you dancing around in tippy-toes of joy in front of your oven as you eagerly wait for the timer to go off.  It is the type of breakfast that pulls bleary-eyed sleepers away from happy dreams and warm beds and into the kitchen on cold mornings.  This is dessert showing up as breakfast at your doorstep on Halloween.

I saw these on apartment therapy a few weeks back and promptly booked marked them, knowing that I would have to have them.  I made them for a leisurely Sunday breakfast and was so glad that I did. As they do require some advanced prep work, they are not a spur-of-the moment breakfast, but they are perfect for special occasions like holidays or birthdays.  Be aware that this recipe makes a lot of rolls. If you are not feeding a crowd, I recommend halving the recipe.   I made the whole thing and was able to send one pan full over to our neighbors to enjoy, as well.

To adapt the recipe, I swapped out the dairy ingredients for their vegan counterparts.  I also swapped out white flour for a mixture of whole wheat and spelt flours (to attempt to assuage feelings of guilty decadence),  cut down the sugar by just a touch, and I swapped in Rice Nog for the milk to add just that much more holiday goodness to each bite.  I also swapped out individual spices for pumpkin pie spice because I love that stuff at this time of year.


I also have a confession to make.  I took a few of the leftover rolls the next day and slathered them in some maple butter cream frosting I had leftover in my refrigerator from a batch of cupcakes I had made earlier in the week and served them for dessert.  Oh. My. Goodness.  Over the top decadence.  My sweet tooth swooned.  And that is how you make a food item multi-task.


Pumpkin Rolls with Brown Sugar Glaze
Adapted from The Kitchn at Apartment Therapy

(instructions are verbatim except for my substitutions)

Dough:
¼ cup water
1 package yeast
1 cup Rice Nog
½ cup Earth Balance butter
¼ cup sugar
1 15 oz can pumpkin
¼ cup brown sugar
1 ½ tsp salt
3 cups whole wheat flour
3 cups spelt flour

Filling:
½ cup Earth Balance butter
1 cup brown sugar
4 tsp pumpkin pie spice
1 cup chopped pecans

Glaze:
½  cup Rice Nog
½ cup butter
½ cup brown sugar
Pinch salt
2 cups powdered sugar

Sprinkle the yeast over the water and let it sit a few minutes until the yeast is dissolved. Meanwhile, warm the Rice Nog and Earth Balance in a small saucepan on the stove top until the EB is melted. Combine this with the sugar in a large heat-proof mixing bowl and stir until the sugar is completely dissolved.

Let the Rice Nog mixture cool until it is just warm to the touch – NOT HOT. Then stir in the yeast and the pumpkin. Add the salt and all of the flour all at once, stirring until all the flour has been absorbed. Squish it between your hands if you’re having trouble incorporating the last of the flour. The dough will be sticky, but should come together in a shaggy ball. If it’s still more the consistency of cookie batter, work in an additional 1/2 cup of flower.

Cover the dough and let it rise for 1-3 hours. Do not panic if it does not get very large in bulk.  It will be OK.   After letting it rise, you can punch the dough down and refrigerate it overnight or continue shaping the rolls.

To shape the rolls (either immediately or with the refrigerated dough), sprinkle your work surface with a little flour and dump the dough on top. Pat it down into a rough rectangle and then use a floured rolling pin to roll it into a rectangular shape about a half an inch thick, longer than it is wide. If the dough gets sticky, sprinkle a little more flour on the dough’s surface and on your hands.

Melt the Earth Balance in the microwave and stir in the brown sugar and the pumpkin pie spice. Spread this over the rectangle of dough, leaving an inch of bare dough at the top. Sprinkle one cup of the toasted pecans over the dough, if using. Starting at the edge closest to you, roll the dough into a cylinder and pinch it closed at the top.

Rub a tablespoon of soft Earth Balance into the bottom of two 9×13 baking dishes, two 9-inch cake pans, or a combination. (I used one oval baking dish and one glass pie dish)  Using a bench cutter or a sharp knife, cut the cylinder into individual rolls 1 – 1 1/2 inches thick (confession: I made mine bigger, probably in the 1.5 – 2” range).  Place them into your baking dishes so they have a little wiggle room on all sides to rise. Cover them with a clean kitchen towel and let them rise until they fill the pan and look puffy, 30 minutes for already-warm dough and 1 hour for dough that’s been refrigerated.

About 20 minutes before baking, begin heating the oven to 375°. When the rolls are ready, bake them for 20-25 minutes, until the tops are golden and starting to look toasted around the edges. Rotate the pans halfway through cooking.

While they are baking, prepare the glaze. In a small saucepan over medium heat, combine the Rice Nog and Earth Balance. When the EB has melted, add the brown sugar and salt. Stir until the brown sugar has melted.   Stir in the powdered sugar. This should form a thick but pourable glaze.

Let the baked rolls cool for about five minutes and then pour the glaze on top. Sprinkle the remaining cup of pecans over the top, if more nuttiness is desired. Eat them immediately. Leftovers will keep for several days and are best reheated for a minute in the microwave


Read Full Post »

I must admit – flourless cake is not a favorite dessert of mine. It doesn’t even crack the top 25. I have never once ordered it in a restaurant, never picked it out of a bakery’s glass case, and never requested it as a special treat. What can I say? I am a carb lover, through and through. If I am going to have cake, you can bet there’s going to be flour in there. Ice cream, on the other hand, I could happily eat every day. I love my ice cream maker, but it has been sitting up on the shelf for so long that I was afraid it was starting to grow roots up there. I was glad to have an excuse to blow the dust off of it and put it to use.

As is usually the case, this month’s DB challenge was one that relied heavily on dairy. Veganizing the challenge was the easy part compared to what else I had to do with it:

Not use any refined sugars.

You read that right. No refined sugars. Several months ago I discussed my desire to cut back on refined sugars, but then the holidays came and I reverted back to viewing sugar as a food group all of its own. When Ash Wednesday rolled around this year, I decided to give up refined sugar for Lent. Of course, I left this DB challenge to the very last day (today) which means that it now falls under the “no refined sugar” rule. I was happy that it was cake paired with ice cream rather than one that relied on frosting or something else entirely sugar dependent.

I’m happy to report that the recipes came out quite well, though I would definitely tweak them if I were to make them again. The cake turned out chewy and very, very chocolately. Incredibly chocolately – a little too chocolately for my liking, but it would be a true chocoholic’s dream come true. The ice cream had great consistency and a yummy coconut flavor, but it would have benefited from a wee bit more sweetness. I would recommend adding some agave to the ice cream to make it just that much better of a companion for the rich chocolate cake.

Of course, that could be my jonesin’ sweet tooth talking.

Strawberries and Coconut Cream Ice Cream

1 carton Mori Nu silken tofu
1 14 oz can coconut milk
1/3 cup brown rice syrup
1 tsp vanilla
1 cup sliced strawberries

1.    Puree tofu, coconut milk, brown rice syrup, and vanilla in a food processor or blender until smooth.

2.    Pour into ice cream maker and mix per manufacturer’s instructions (for my Cuisinart ice cream make I mix it for 30 minutes).

3.    Pour ice cream into freezer safe bowl, stir in strawberries, and freeze for at least 4 hours before servings.

Chocolate Flourless Cake

9 oz dark chocolate (I used three bars of Endangered Species Extreme Dark Chocolate)
½ cup soy butter or margarine
1 6 oz container plain soy yogurt
½ cup soy milk (or other dairyless milk) + 2 tbsp arrowroot powder
3 tbsp cocoa powder
1 tsp vanilla

1.    Preheat oven to 350F and grease a springform pan.

2.    Melt chocolate and soy butter in a double boiler over low heat until smooth.

3.    While the chocolate is melting, stir the arrowroot into the soy milk and whisk with a fork until completely dissolves.  Pour the soy milk mixture into a mix bowl, add the yogurt and vanilla and mix until well combined.  Add the cocoa powder and mix until smooth.   Pour in the chocolate mixture and mix on medium high for 2 minutes.

4.    Pour batter into the prepared pan and bake for 35 minutes.  Cool on a wire rack for 20 minutes before unmolding.  Refrigerate for at least 1 hour before serving.

Required text for this month’s challenge:

The February 2009 challenge is hosted by Wendy of WMPE’s blog and Dharm of Dad ~ Baker & Chef.
We have chosen a Chocolate Valentino cake by Chef Wan; a Vanilla Ice Cream recipe from Dharm and a Vanilla Ice Cream recipe from Wendy as the challenge.

Read Full Post »


Hawaii has many, many bananas.  Anyone who has ever lived here can attest to the bounty of banana trees that permeate the yards and gardens of the islands.  Banana trees are incredibly low maintenance to grow, but they are high maintenance to maintain.  They grow prolifically in the mineral rich Hawaiian soil, full tropical sun, and Pacific rains, which is  exactly the challenge of attempting to tame them – they get big, bushy, and can take over if you’re not careful.  Most households with banana trees also have their banana tree machete to keep the trees at bay, to chop down the bunches of bananas when they are ready, and to hack away the trees that are past their prime.  We used to have banana trees of our own when we first moved to Maui, but now we are just the happy beneficiaries of the fruits of our neighbor’s banana tree labors.

This abundance of bananas explains Hawaii’s abundance of banana bread recipes.  As you drive along any rural road in the islands you will encounter numerous road side stands and shops selling auntie’s or uncle’s homemade banana bread – guaranteed to be the best in the islands.  Everyone has their favorite.  Over the years, I have amassed a large number of banana bread recipes in my recipe binder and I happily have plenty of opportunities to try them all out.


I made this bread last week when we were gifted with a large bunch of bananas from our friend who lives next door.  It has a particularly tropical flair due to the addition of coconut, lime, and macadamia nuts.  It was adapted from an old Cooking Light recipe.  If you want to take it a  step further and dress it up for dessert, you can quickly whisk together some confectioners sugar and lime juice to create a glaze to spoon over top of warm slices;  garnish with coconut and sliced mac nuts and – voila! – fancy dessert.   Personally, I like mine plain and simple, but I will warm up a slice in the microwave and smear a bit of warm soy butter over it to enjoy for breakfast before skipping out the door to work.   The beauty of banana bread, in my opinion, is in its versatility.


Coconut, Lime, and Macadamia Nut Banana Bread
Makes 1 loaf

2 cups flour
¾ tsp baking soda
1/2 tsp salt
¾ cup sugar
¼ cup soy butter or margarine
1/8 cup canola oil
3-4 mashed bananas
¼ cup vanilla soy yogurt
3 tbsp spiced rum
3 tbsp lime juice
½ tsp vanilla
½ cup unsweetened flaked coconut
½ cup chopped macadamia nuts

Extra flaked coconut to sprinkle on the top of the loaf

1.    Preheat oven to 350F.

2.    Combine the flour, baking soda, and salt in a bowl and set aside.

3.    Cream together the soy butter/margarine and sugar with a mixer, then add the oil and mix until well combined.  Add in the banana, soy yogurt, rum, lime juice, and vanilla and mix until blended.  Add the flour mixture and mix at a low speed until just combined.  Stir in the coconut and macadamia nuts.

4.    Pour the batter into a 9×5 inch loaf pan coated with cooking spray and sprinkle the top of the loaf with the extra flaked coconut.  Bake for 50-60 minutes, until a wooden toothpick inserted in the center comes out clean.

5.    Cool for 10 minutes in the pan on a wire rack before removing from pan.


Read Full Post »

I would like to start this post by giving a shout out to the greatest football team ever to walk God’s Green Earth: the Pittsburgh Steelers.

In honor of the World’s Best Football Team, I bring you the World’s Best Chocolate Chip Cookie. Each – the Pittsburgh Steelers and the Chocolate Chip Cookie – really are the consummate players in their respective fields – professional sports and cookies. As a connoisseur of both, I do not use the term “world’s best” lightly; so rest assured that these are some seriously good cookies.

Last summer the New York Times published a writer’s quest to find the perfect chocolate chip cookie. After interviewing a number of famous bakers, the requirements for the perfect chocolate cookie seemed to boil down to this list:

1. Use good chocolate
2. Use a lot of chocolate
3. Sprinkle the cookies with salt
4. Serve them warm
5. Make ‘em big
6. Rest your dough for 36 hours

I had you until #6, didn’t I?

Let’s break down the list.

#1 and #2 – Use good chocolate and lots of it.

The NYT article features a recommendation for the use of chocolate disks as opposed to the traditional chocolate chip because of how they melt – the disks will melt to create a more uniform strata of chocolate within the cookie rather than the isolated chunks of chocolate the chips create. Also, all contributors to the article strictly adhere to a cacao content of no less than 60%.

I’ve tried this recipe with both – disks and chips – and I will vouch for the use of disks over chips. You can find fancy chocolate disks online, but I found mine in the chocolate section at Whole Foods on a trip I made to the Mainland in November. I used the Noel Royale Buttons with 64% cacao content and was quite pleased with the results.

#3 – Sprinkle the cookies with salt.

Salt is used in baked goods to heighten the flavor of the other ingredients and to add a new dimension to the sweet. Salt is called for in this dough and then, just before you pop them into the oven, generously sprinkle the unbaked cookies with coarse sea salt – the grains will bake into the tops of the cookies and will adhere much better than if you try to sprinkle them post-baking.  MmmmmMMMmmmm ……

#4 – Serve them warm.

This really is a no-brainer. While some things do improve in flavor after a cool down period on a wire rack, chocolate chip cookies are so darn good warm because of the ooey-gooey factor of melted chocolate. Let the cookies cool just long enough so as to not scald your tongue – maybe 10-12 minutes – then break one of these in half and marvel at the perfect-looking ribbons of chocolate spanning between your fingers. Yum! These do, admittedly, taste amazing even at room temperature, but do be sure to enjoy some warm straight out of the oven!

#5 – Make ‘em big.

Again, this seems like a no-brainer, right – the bigger the better! That’s not always true, however, with mini- desserts being all the rage these days – some people will actually turn down a cookie for being too big. Incredible! But there really is a reason for super sizing chocolate chip cookies, and it’s not just so that we can make big pigs of ourselves. The bakers in the NYT article refer to it as the Rule of Thirds:

“First there’s the crunchy outside inch or so … A nibble revealed a crackle to the bite and a distinct flavor of butter and caramel. Then there’s the center, which is soft. A bull’s-eye the size of a half-dollar yielded easily. But the real magic … is the one-and-a-half-inch ring between them where the two textures and all the flavors mix.”

Making your cookies six-inch beasts will result in this symphony of textures and flavors.

#6 – Rest your dough for 36 hours.

The science behind letting the dough rest for 36 hours is that it allows the dry ingredients to fully absorb the wet ingredients. When you first mix the two together, your butter ingredient will act as a barrier between the dry ingredients and the wet ingredients. Let the dough rest for a full 36 hours, however, and that barrier is broken down and your wet ingredients get fully absorbed by the dry. This results in a cookie that has a greater depth of flavor; with caramel and toffee undertones from the brown sugar and a more fully developed appearance of brown when baked. The dough is also a bit more crumbly at this point and holds together much better when rolled into golf ball sized hunks and placed on your cookie sheet. They retain their shape better when baked and what you end up with is a perfect looking – and tasting – cookie.

I have made these several times, and a few times I cheated the 36-hour rule – once I rested the dough overnight for about 12 hours and another time I only rested the dough for about 3 hours. You will still end up with very, very good cookies that no one will scoff at – but the magic really is in that 36-hour rest period. 36 hours of rest = cookies that look too perfect to be true.

And that brings us to the recipe. What, in my opinion, makes this version even better than the original? The exclusion of animal products. Below is my cruelty-free version of the NYT original and I cannot recommend these enough. Make these for your Valentine and I promise you they’ll swoon. You can thank me later 😀

Chocolate Chip Cookies
The original NYT recipe can be found here

Adapted from Jacques Torres
Time: 45 minutes (for 1 6-cookie batch), plus at least 24 hours’ chilling

2 cups minus 2 tbsp (8 1/2 ounces) cake flour
1 2/3 cups (8 1/2 ounces) bread flour
1 ¼ tsp baking soda
1 ½ tsp baking powder
1 ½ tsp coarse salt
2 ½ sticks (1 ¼ cups) Earth Balance (or other butter alternative)
1 ¼ cups (10 ounces) light brown sugar
1 cup plus 2 tbsp (8 ounces) granulated sugar
4 tbsp canola oil
2 tsp natural vanilla extract
½ lb bittersweet chocolate disks or fèves, at least 60 percent cacao content
Sea salt.

1. Sift flours, baking soda, baking powder and salt into a bowl. Set aside.

2. Using a mixer fitted with paddle attachment, cream Earth Balance and sugars together until very light, about 5 minutes. Add canola oil, one tablespoon at a time, mixing well after each addition. Stir in the vanilla. Reduce speed to low, add dry ingredients and mix until just combined, 5 to 10 seconds. Drop chocolate pieces in and incorporate them without breaking them. Press plastic wrap against dough and refrigerate for 24 to 36 hours. Dough may be used in batches, and can be refrigerated for up to 72 hours.

3. When ready to bake, preheat oven to 350 degrees. Line a baking sheet with parchment paper or a nonstick baking mat. Set aside.

4. Scoop 6 3 1/2-ounce mounds of dough (the size of generous golf balls) onto baking sheet, making sure to turn horizontally any chocolate pieces that are poking up; it will make for a more attractive cookie. Sprinkle lightly with sea salt and bake until golden brown but still soft, 18 to 20 minutes. Transfer sheet to a wire rack for 10 minutes, then slip cookies onto another rack to cool a bit more. Repeat with remaining dough, or reserve dough, refrigerated, for baking remaining batches the next day. Eat warm, with a big napkin.

Yield: 1 1/2 dozen 5-inch cookies.

Read Full Post »

December 31st is a day to take stock of the year passed, a day to celebrate our gems and recognize our challenges in order to capitalize on these opportunities for improvement in the coming year.  I personally enjoy this occasion to formally recognize one year’s passing and ready myself for the possibilities of the year ahead. Isn’t that really what is at the heart of the celebration of the New Year:  all of the possibilities contained within the yet unturned pages of the new calendar?  Possibility, if it were an emotion, could easily be hope – the thing that drives us, lifts our spirits, and makes us look towards the future with enthusiasm and gratified anticipation.  The new year is a blank slate upon which we can write our hopes, dreams, and goals.

Come January 1st, however, we should not sweep the previous year under the rug – we should enter the new year armed with the accomplishments that were celebrated, lessons that were learned, and growth that incurred during the previous twelve months.  In that spirit, I would like to take this opportunity to share with you all our favorite recipes from the Outpost for 2008.  These recipes will definitely be making repeat appearances on our table in 2009.

I wish each and everyone of you a very happy, healthy, joyous, and prosperous 2009.

Hau’oli Makahiki Hou!

The Best of the Outpost in 2008

The Best of the Outpost in 2008

Working from the top left to bottom right:

Danish Braid

French Yule Log

Green Papaya Salad

Crepes

Small Tarts

Jambalaya Stuffed Eggplant

Pineapple Poppy Seed Ice Cream

Fesenjan

Pumpkin Pie

Lemon Gems

Noodle Kugel

Seitan Pot Roast Brisket

Raw Papaya Banana Pie

No Piggies in Blankets

Roasted Butternut Squash, Potato, Apple, and Caramelized Onion Bisque with Pepita-Poblano Garnish

Giant Chocolate Chip Cookie Cake

Enjoy!

Read Full Post »

Imagine my pleasant surprise when I read this introduction to this month’s Daring Baker’s Challenge:

“This month’s challenge is brought to us by the adventurous Hilda from Saffron and Blueberry and Marion from Il en Faut Peu Pour Etre Heureux. They have chosen a French Yule Log by Flore from Florilege Gourmand.”

Why the pleasant surprise? For one, I had been hoping to make a Yule Log this holiday season and this DB mandate was just the kick in the butt I needed to make it happen. Two, a French Yule Log differs from its genoise and buttercream counterpart in that it is a frozen confection – perfect for a holiday treat on Maui.

Perusing the 18 page document that contained the recipe did, admittedly, give me pause. A French Yule Log contains no fewer that six elements, which include a ganache, a mousse, and a – gulp – crème brulee. Good grief – yet another recipe that would attempt to bully me around my kitchen with its decidedly un-vegan swagger! This dessert is layer upon layer of eggs, butter, heavy cream, and gelatin. It was going to take one heck of a makeover to make this girl the belle of the vegan ball.

This recipe involved the six required elements all layered together into one frozen cake like dessert. This month’s hosts, though strict in their requirement that all six elements be included, left a lot of room for freedom in flavor choices. I decide to give my Yule Log a Maui flavor with coconut and macadamia nuts. Upon doing this recipe again, I may try to flavor the custard with coconut milk instead of vanilla, and I might try to incorporate some fruit flavors into it – mango, papaya, banana, guava, or lychee would be especially nice and would compliment the coconut, macadamia, and chocolate already present in the log.

For past DB challenges I have veganized the recipe straight from the original; this time, however, I decided to call upon several resources to assist in the makeover: my favorite vegan confections cookbook (Vegan Cupcakes Take Over the World) and my trusty kitchen companion, Google. Element by element, here are the choices I made:

Element #1 –Dacquoise: I utilized the recipe as was written, only subbing in Ener-G “eggs” along with some baking powder and apple cider vinegar (to give the cake a wee bit of lift) for the three eggs that were called for.

Element #2 – Dark Chocolate Mousse: I considered subbing in a vegan chocolate mousse, but instead I utilized a vanilla custard recipe that I used in these tarts back in February. I really love the flavor of this custard and I wanted something to lighten up the other chocolate elements included in the Log.

Element #3 – Creme Brulee Insert: My jaw dropped at this one. I was a bit stumped as to how to create a vegan crème brulee, so I took to Google and a search for “vegan crème brulee” returned with this recipe. Vegan Visitor is a blog that I frequently read so I was more than happy to give it a go (I was really happy that I did – I look forward to making this recipe again on its own and “brulee-ing” it the next time.).

Element #4 – Praline Crisp Insert: This involved making praline paste. I used the praline paste recipe from our July DB challenge, only this time I replaced the hazelnuts with macadamia nuts in order to create a more “Maui” flavor.

Element #5 – Ganache Insert: I used the chocolate ganache recipe from Vegan Cupcakes Take Over the World.

Element #6 – Dacquoise: I again utilized the creative expertise of Isa Chandra Moskowitz and Terry Hope Romero and used the chocolate buttercream frosting recipe from Vegan Cupcakes Take Over the World.

This recipe involved numerous steps, produced a lot of dirty dishes, and required two days to make. That said, it was all well worth it. This dessert is pretty darn impressive – and, I’ll let you in on a secret: unless you decide to tell them, no one will know that it’s vegan. I promise you. Serve it to your most discerning “vegans must only eat nuts and berries” loved ones and bask in their stunned expressions when, after gobbling up a slice, you share the secret with them.

Why the stunned expressions? This dessert is seriously decadent. It really is numerous desserts all wrapped up into one chocolate frosted confection, desserts which, on their own, are all decadent and rich: custard (mousse), crème brulee, praline, ganache, etc. Leave it to the French to decide to pile it all onto one plate in one very pretty package! (Gotta love the French!) As you really only need a tiny sliver to enjoy it(I recommend accompanying it with a nice cup of coffee or tea), you can serve a crowd with just one Yule Log. This is definitely not a “Wednesday-after-work” sort of dessert – this is a special occasion dessert. I highly recommend that you bookmark this dessert and trot it out at your next special occasion to entertain a crowd.

Now, if you’ll excuse me, I have to go paddleboard myself around the ocean to burn off the calories consumed in the making of this dessert!

French Yule Log

Element #1: Dacquoise Biscuit (Almond Cake)

½ cup + 1 tbsp almond meal
2/3 cup flaked coconut
½ cup confectioner’s sugar
2 tbsp all-purpose flour
2 Ener-G “Eggs”
1 tsp baking powder
1 tsp apple cider vinegar
4 tbsp granulated sugar

1. Finely mix the almond meal, coconut, and the confectioner’s sugar. Sift the flour into the mix.

2. Beat in the “eggs”, baking powder, and vinegar, then mix in the sugar until combined.

3. Grease a piece of parchment paper and line your baking pan with it. Spread the batter onto the parchment paper to an area slightly larger than your desired shape (circle, long strip etc…) and to a height of 1/3 inches.

4. Bake at 350°F for 12-15 minutes, until golden.

5. Let cool and cut to the desired shape.

Element #2: Vanilla Custard (in place of Dark Chocolate Mousse)

Recipe can be found here.

Element #3 Dark Chocolate Ganache Insert

I used the Chocolate Ganache recipe from Vegan Cupcakes Take Over the World.

Note: Because the ganache hardens as it cools, you should make it right before you intend to use it.

Element #4 Praline Crisp Insert

3.5 oz semi-sweet chocolate
1 2/3 tbsp Earth Balance
2 tbsp macadamia nut praline paste (recipe can be found in this post)
1 cup Rice Krispies

1. Melt the chocolate and EB in a double boiler.

2. Add the praline and the Rice Krispies. Mix quickly to thoroughly coat with the chocolate.

3. Spread between two sheets of wax paper to a size slightly larger than your desired shape. Refrigerate until hard.

Element #5: Crème Brulee Insert

Vegan Visitor’s recipe can be found here.

Element #6: Chocolate Icing

I used the Fluffy Chocolate Buttercream Frosting recipe from Vegan Cupcakes Take Over the World.

Garnish:

1/3 cup chopped macadamia nuts
1/3 cup flaked coconut

Toast in a dry skillet over medium heat for 5-7 minutes, until golden. Keep a close eye – this can go from toasted to burnt very quickly.

Assembly:

The order of elements is:

1. Dacquoise
2. Custard
3. Creme Brulee Insert
4. Custard
5. Praline/Crisp Insert
6. Custard
7. Ganache Insert
8. Dacquoise

1. Cut the Dacquoise into a shape fitting your mold and set it in there.

2. Spread one third of the Custard component on the Dacquoise.

3. Take the Creme Brulee Insert out of the freezer at the last minute and set on top of the Custard. Press down gently to slightly ensconce it in the Custard.

4. Spread second third of the Custard component around and on top of the Creme Brulee Insert.

5. Cut the Praline/Crisp Insert to a size slightly smaller than your mold so that it can be surrounded by Custard. Lay it on top of the Custard you just spread into the mold.

6. Spread the last third of the Custard component on top of the Praline Insert.

7. Gently spread the Ganache Insert onto the Custard leaving a slight edge so that ganache doesn’t seep out when you set the Dacquoise on top.

8. Close with the last strip of Dacquoise.

9. Freeze until the next day.

The Next Day:

10. Unmold the log and set on plate.

11. Cover the cake with the frosting. Gently press the toasted coconut and macadamia nuts onto the tops and sides. Return to the freezer.

To Serve:

Transfer to the refrigerator no longer than 1⁄2 hour before serving as it may start to melt quickly depending on the elements you chose.

Run a sharp knife under hot water, wipe off the water, and use to make slicing the log easier.

Read Full Post »

Lemon Gems

When I opened up the December issue of Gourmet, I was instantly drawn to one very sparkly, very pretty, very glittery cookie. But do you know what’s even better than a pretty face? Substance. The object of my affection was filled with fluffy cream.

I set out to make these Glittering Lemon Sandwich Cookies on Thursday evening, in anticipation of bringing them along to my many meetings on Friday. The recipe in Gourmet instructed me to place “scant teaspoon” sized balls of dough onto the cookie sheet. My cookies were going down on the pan as chubby tablespoons. When they came out of the oven, I laughed out loud at the idea of making sandwich cookies out of them – they would have been the fattest cookie sandwiches ever. Well, maybe not ever. I believe that the long ago forgotten Oreo Big Stuff still holds that title.

But they would have been uncomfortably big for people to eat. So I ditched the sandwich idea and just piped the lemony icing right on top of each cookie and served them up as singletons. People were singing their praises all Friday long.

I was instantly enamored of these cookies. They are so darn pretty. And the taste … oh my goodness. They are good. These are perfect holiday cookies: glittery, pretty, and delicious.

Lemon Gems
Recipe adapted from Glittering Lemon Sandwich Cookies – Gourmet, December 2008

Makes about 50 cookies

Cookies

1 1/3 cups all-purpose flour
2/3 cup cornstarch
¼ tsp salt
2 sticks Earth Balance (or butter substitute of choice), softened
½ cup confectioners sugar
1 tbsp grated lemon zest
1 tsp vanilla
Sanding sugars

Filling

1 cup confectioners sugar
1 tbsp grated lemon zest
1 tbsp fresh lemon juice
2 tbsp light corn syrup
½ stick Earth Balance, softened

Make cookies:

1. Preheat oven to 350°F with rack in middle. Line 2 large baking sheets with parchment paper or silipat sheet.

2. Whisk together flour, cornstarch, and salt.

3. Beat together Earth Balance and confectioners sugar with an electric mixer until pale and fluffy, then beat in zest and vanilla. At low speed, mix in flour mixture just until a soft dough forms.

4. Put sanding sugars in different bowls. Roll a scant tsp of dough into a ball and drop into sugar, turning to coat. Reshape if necessary and transfer to a baking sheet. Repeat, spacing balls 3/4 inch apart, until baking sheet is filled.

5. Bake until tops are slightly cracked but still pale (bottoms will be pale golden), 15 minutes. Transfer cookies to a rack to cool completely. Form and bake more cookies on second baking sheet.

Make filling:

6. Beat together all filling ingredients in a large bowl with an electric mixer at medium speed until combined well. Transfer to sealable bag and snip off a corner. Pipe about 1/2 tsp filling on top of each cookie.

Read Full Post »

Spritz Cookies

After the cake debacle left me with no sweet treat for my guests, I kicked into overdrive to find an adequate replacement that I could make with the clock ticking. As I scanned my cupboards for inspiration, one thing jumped out at me, a most unsuspecting item: a box that looked like it came to me straight out of 1972. It was a cookie press that I had scored new in the box for $1.99 several years ago. It remained new in the box in my kitchen as I had never even opened it to make use of it.

I quickly found a recipe for cookie press cookies from Martha Stewart that looked easy and for which I had all the ingredients on hand. I subbed in Earth Balance for butter and canola oil for egg yolks (2 tablespoons of oil per each large egg yolk the recipe called for). To make the dough festive, I divided it in half and mixed in green food coloring to one half and red food coloring into the other half. I topped the cookies off with some sanding sugars before popping them into the oven.

I could not believe how easy these cookies were to make, or how easy the cookie press was to use. Literally, just point and shoot! I can’t believe that for all this time I have been missing out. Now I want to make spritz cookies every day … just because I can. One trick that I did develop was to use two cookie sheets, but only put one in the oven at a time, so as to chill the other. I had found with my second batch that the dough coming out of the press did not stick to a hot cookie sheet. As one batch baked, I let one sheet cool over my sink and stuck the dough and press into the fridge to let it chill. I found that this system worked quite efficiently for me.

My secret for perfectly done cookies is to pull them out of the oven before they look done. If you leave them in until they start browning they are, in my opinion, already too far gone. I know that some people enjoy the crispiest cookies the best. Admittedly, I am not one of them. For these types of cookies, in particular, I enjoy a nice crisp outside that yields easily to a soft inside. To achieve that effect, I timed these cookies at exactly 10 minutes. I sacrificed the first batch by letting them go for 12 minutes, which resulted in very crispy browned edges and bottoms. They did not end up the trash, though – I set those aside for the extra crispy lovers among us to enjoy. I did not, however, put them out for all to see!

Spritz Cookies
Adapted from this recipe by Martha Stewart
Makes 6- 8 dozen cookies

1 ½ cups (3 sticks) Earth Balance (or other butter substitute of your choice)
1 cup sugar
4 tbsp canola oil
3 ¾ cups sifted all-purpose flour
¼ tsp salt
1 tbsp pure vanilla extract
Colored sanding sugar

1. Heat oven to 350 degrees. In a large bowl, cream the Earth Balance and sugar until light and fluffy. Add canola oil and mix, then add flour, salt, and vanilla. Mix thoroughly.

2. Fill a cookie press with the dough, and turn out cookies 1 to 2 inches apart onto a non-oiled baking sheet. Sprinkle cookies with colored sanding sugars.

3. Bake until the cookies are lightly browned, 7 to 10 minutes. To ensure even baking, rotate sheet halfway through the baking process. Transfer to a wire rack, and let cool.

One of my guests who enjoyed these cookies asked about any sweetener substitutions I made. Oops – busted! Despite my commitment to cutting out refined sugars, the two holiday recipes I’ve made thus far this season – fruit cake and these cookies – have found me sneaking sugar back in. We discussed the difficulty of mitigating health resolutions and ingredient substitutions with tried-and-true traditions. Have any of you had success with substituting some of the naughtier ingredients in traditional holiday recipes with their nicer and healthier counterparts? If so, please share your stories and tips in the comments below.

Read Full Post »

Tropical Fruit Cake

We are now entering my absolute most favorite time of the year – the Holiday Season. The time from Halloween through New Year’s tickles my fancy like no other time of year can. I love the peppy music, the feel-good movies, the cookies, the traditions, the ornament-laden tree, crafting the ornaments, the cards, wrapping gifts, the gatherings, and that warm and fuzzy feeling that seems to take over most people at this time of year.

I don’t love the commercialism, the consumerism, the malls, the advertisements, the materialism, the “buy-buy-buy!” mentality, or the charity scams that always seem to emerge around the holidays. That is why, in my own simple way, I like to stick it to The Man by taking the DIY route. I believe that the best way for me to show love and appreciation is with my own two hands, my hard work, and my good ol’ fashioned sweaty efforts; therefore, I like to go the homemade route for the holidays. I also think that unique, creative, non-commercialized acts are the ones that form our family traditions. Which leads me to today’s post, the first of what will be many holiday-themed posts … and what is more traditional than fruitcake?

This fruitcake is now a family tradition at the Outpost. It was originally a Martha Stewart recipe that inspired me. I adapted her recipe to suit my tastes, but I stayed true to her belief that fruitcake should not be filled with those oddly colored candied fruits. I use lots of dried fruits and nuts in mine, ones that bring a distinctly tropical flair to this traditional holiday treat. You, however, can adapt the nuts and dried fruits to suit your corner of the world.

I made a large batch of loaves two weekends ago. I like to give them as gifts, and I like to allow them plenty of time to develop their flavors.

This recipe includes refined sugars, despite my recent decision to bake almost exclusive with unrefined sugars. When I pulled out the recipe, I considered altering it but then decided to stick with tradition. I am, however, testing out several experimental loaves to see how they turn out with unrefined sources of sugar so that, hopefully, next year I will be able to share a healthier version. In the meantime, let’s indulge as this time of year only comes around once a year. 😀

Tropical Fruit Cake
Makes 1 large loaf or 3 mini loaves

2 cups unbleached flour
2/3 cup cake flour
1/3 tsp baking powder
1/3 cup sugar
1/3 cup brown sugar
1 small pinch of salt
1 1/3 stick Earth Balance Buttery Spread
½ cup vanilla soy yogurt
1 tsp vanilla
2 tbsp spiced rum
1/3 cup chopped dried pineapple
1/3 cup chopped dried papaya
1/3 cups dried chopped dates
1/3 cup dried cherries
2/3 cup whole raw almonds
½ cup chopped lightly roasted (no salt added) macadamia nuts
¼ cup chopped coconut
¼ cup of rum for dousing

1. Preheat oven to 300F. Oil sides of pan, line bottom with parchment paper and brush with oil.

2. Combine fruits and buts in a bowl and set aside.

3. Sift flours, baking powder, and salt into another bowl and set aside.

4. Cream together the Earth Balance and the sugars in a third on medium speed until fluffy, about 3 minutes. Add the soy yogurt a little at a time until incorporated (the mixture will look a little goopy at this point – that’s ok!). Mix in the vanilla and the rum.

5. Slowly add in the flour mixture, mix until just combined. Be sure to scrape down the sides of the bowl. The mixture will be good and thick.

6. Fold in the nuts and fruits into the batter. Fold in the coconut. Pour batter into prepared pan and smooth the top.

7. Bake the cake until golden on top and an inserted toothpick comes out clean. My large loaves bake for about an hour and a half, my mini loaves bake for about an hour. Be sure to cover the top with foil if the cake is browning too quickly.

8. Cool the cake on a wire rack. Remove the cake from the pan and discard the parchment. Douse a regular sized loaf with ¼ cup of rum; douse mini loaves with 1-2 tablespoons of rum.

9. Wrap the cake in cheesecloth or muslin. Store in a cool, dark place (I store mine in my refrigerator) and douse weekly with rum for at least one month before sharing.

Read Full Post »

Older Posts »