Feeds:
Posts
Comments

Posts Tagged ‘cake’

Imagine my pleasant surprise when I read this introduction to this month’s Daring Baker’s Challenge:

“This month’s challenge is brought to us by the adventurous Hilda from Saffron and Blueberry and Marion from Il en Faut Peu Pour Etre Heureux. They have chosen a French Yule Log by Flore from Florilege Gourmand.”

Why the pleasant surprise? For one, I had been hoping to make a Yule Log this holiday season and this DB mandate was just the kick in the butt I needed to make it happen. Two, a French Yule Log differs from its genoise and buttercream counterpart in that it is a frozen confection – perfect for a holiday treat on Maui.

Perusing the 18 page document that contained the recipe did, admittedly, give me pause. A French Yule Log contains no fewer that six elements, which include a ganache, a mousse, and a – gulp – crème brulee. Good grief – yet another recipe that would attempt to bully me around my kitchen with its decidedly un-vegan swagger! This dessert is layer upon layer of eggs, butter, heavy cream, and gelatin. It was going to take one heck of a makeover to make this girl the belle of the vegan ball.

This recipe involved the six required elements all layered together into one frozen cake like dessert. This month’s hosts, though strict in their requirement that all six elements be included, left a lot of room for freedom in flavor choices. I decide to give my Yule Log a Maui flavor with coconut and macadamia nuts. Upon doing this recipe again, I may try to flavor the custard with coconut milk instead of vanilla, and I might try to incorporate some fruit flavors into it – mango, papaya, banana, guava, or lychee would be especially nice and would compliment the coconut, macadamia, and chocolate already present in the log.

For past DB challenges I have veganized the recipe straight from the original; this time, however, I decided to call upon several resources to assist in the makeover: my favorite vegan confections cookbook (Vegan Cupcakes Take Over the World) and my trusty kitchen companion, Google. Element by element, here are the choices I made:

Element #1 –Dacquoise: I utilized the recipe as was written, only subbing in Ener-G “eggs” along with some baking powder and apple cider vinegar (to give the cake a wee bit of lift) for the three eggs that were called for.

Element #2 – Dark Chocolate Mousse: I considered subbing in a vegan chocolate mousse, but instead I utilized a vanilla custard recipe that I used in these tarts back in February. I really love the flavor of this custard and I wanted something to lighten up the other chocolate elements included in the Log.

Element #3 – Creme Brulee Insert: My jaw dropped at this one. I was a bit stumped as to how to create a vegan crème brulee, so I took to Google and a search for “vegan crème brulee” returned with this recipe. Vegan Visitor is a blog that I frequently read so I was more than happy to give it a go (I was really happy that I did – I look forward to making this recipe again on its own and “brulee-ing” it the next time.).

Element #4 – Praline Crisp Insert: This involved making praline paste. I used the praline paste recipe from our July DB challenge, only this time I replaced the hazelnuts with macadamia nuts in order to create a more “Maui” flavor.

Element #5 – Ganache Insert: I used the chocolate ganache recipe from Vegan Cupcakes Take Over the World.

Element #6 – Dacquoise: I again utilized the creative expertise of Isa Chandra Moskowitz and Terry Hope Romero and used the chocolate buttercream frosting recipe from Vegan Cupcakes Take Over the World.

This recipe involved numerous steps, produced a lot of dirty dishes, and required two days to make. That said, it was all well worth it. This dessert is pretty darn impressive – and, I’ll let you in on a secret: unless you decide to tell them, no one will know that it’s vegan. I promise you. Serve it to your most discerning “vegans must only eat nuts and berries” loved ones and bask in their stunned expressions when, after gobbling up a slice, you share the secret with them.

Why the stunned expressions? This dessert is seriously decadent. It really is numerous desserts all wrapped up into one chocolate frosted confection, desserts which, on their own, are all decadent and rich: custard (mousse), crème brulee, praline, ganache, etc. Leave it to the French to decide to pile it all onto one plate in one very pretty package! (Gotta love the French!) As you really only need a tiny sliver to enjoy it(I recommend accompanying it with a nice cup of coffee or tea), you can serve a crowd with just one Yule Log. This is definitely not a “Wednesday-after-work” sort of dessert – this is a special occasion dessert. I highly recommend that you bookmark this dessert and trot it out at your next special occasion to entertain a crowd.

Now, if you’ll excuse me, I have to go paddleboard myself around the ocean to burn off the calories consumed in the making of this dessert!

French Yule Log

Element #1: Dacquoise Biscuit (Almond Cake)

½ cup + 1 tbsp almond meal
2/3 cup flaked coconut
½ cup confectioner’s sugar
2 tbsp all-purpose flour
2 Ener-G “Eggs”
1 tsp baking powder
1 tsp apple cider vinegar
4 tbsp granulated sugar

1. Finely mix the almond meal, coconut, and the confectioner’s sugar. Sift the flour into the mix.

2. Beat in the “eggs”, baking powder, and vinegar, then mix in the sugar until combined.

3. Grease a piece of parchment paper and line your baking pan with it. Spread the batter onto the parchment paper to an area slightly larger than your desired shape (circle, long strip etc…) and to a height of 1/3 inches.

4. Bake at 350°F for 12-15 minutes, until golden.

5. Let cool and cut to the desired shape.

Element #2: Vanilla Custard (in place of Dark Chocolate Mousse)

Recipe can be found here.

Element #3 Dark Chocolate Ganache Insert

I used the Chocolate Ganache recipe from Vegan Cupcakes Take Over the World.

Note: Because the ganache hardens as it cools, you should make it right before you intend to use it.

Element #4 Praline Crisp Insert

3.5 oz semi-sweet chocolate
1 2/3 tbsp Earth Balance
2 tbsp macadamia nut praline paste (recipe can be found in this post)
1 cup Rice Krispies

1. Melt the chocolate and EB in a double boiler.

2. Add the praline and the Rice Krispies. Mix quickly to thoroughly coat with the chocolate.

3. Spread between two sheets of wax paper to a size slightly larger than your desired shape. Refrigerate until hard.

Element #5: Crème Brulee Insert

Vegan Visitor’s recipe can be found here.

Element #6: Chocolate Icing

I used the Fluffy Chocolate Buttercream Frosting recipe from Vegan Cupcakes Take Over the World.

Garnish:

1/3 cup chopped macadamia nuts
1/3 cup flaked coconut

Toast in a dry skillet over medium heat for 5-7 minutes, until golden. Keep a close eye – this can go from toasted to burnt very quickly.

Assembly:

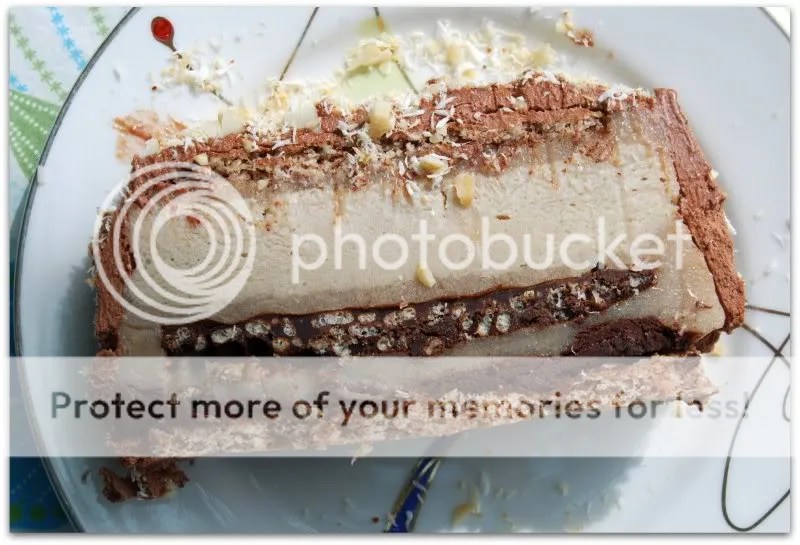
The order of elements is:

1. Dacquoise
2. Custard
3. Creme Brulee Insert
4. Custard
5. Praline/Crisp Insert
6. Custard
7. Ganache Insert
8. Dacquoise

1. Cut the Dacquoise into a shape fitting your mold and set it in there.

2. Spread one third of the Custard component on the Dacquoise.

3. Take the Creme Brulee Insert out of the freezer at the last minute and set on top of the Custard. Press down gently to slightly ensconce it in the Custard.

4. Spread second third of the Custard component around and on top of the Creme Brulee Insert.

5. Cut the Praline/Crisp Insert to a size slightly smaller than your mold so that it can be surrounded by Custard. Lay it on top of the Custard you just spread into the mold.

6. Spread the last third of the Custard component on top of the Praline Insert.

7. Gently spread the Ganache Insert onto the Custard leaving a slight edge so that ganache doesn’t seep out when you set the Dacquoise on top.

8. Close with the last strip of Dacquoise.

9. Freeze until the next day.

The Next Day:

10. Unmold the log and set on plate.

11. Cover the cake with the frosting. Gently press the toasted coconut and macadamia nuts onto the tops and sides. Return to the freezer.

To Serve:

Transfer to the refrigerator no longer than 1⁄2 hour before serving as it may start to melt quickly depending on the elements you chose.

Run a sharp knife under hot water, wipe off the water, and use to make slicing the log easier.

Read Full Post »

I have often extolled the virtues and benefits of eating as many foods in as close to their natural state as possible. Avoid processed foods, eat whole foods, eat organic, eat local, yada yada … you’ve heard it all before, probably from people who have put it more compellingly than I ever could, so I’ll just proceed as if we already all agree on this point 🙂

We eat a lot of raw food here at the Outpost, through no concerted efforts other than we really love fruits and vegetables, and we happen to be fortunate enough to live in a place where terrific produce is available year round. The thing, is, though, that most of our raw cuisine consists of smoothies, salads, nuts, and crudités. Not exactly blog worthy cuisine, eh?

From time to time, however, I do like to concoct more elaborate raw dishes. I have a few favorite raw recipe books that I turn to when the urge to go all-out raw strikes:

Raw Food Real World by Matthew Kenney and Sarma Melngailis
Rawvolution by Matt Amsden
Living Cuisine by Renee Loux Underkoffler
I am Grateful by Terces Engelhart

There are also some really great raw food blogs out there.

I happen to have a few of the items that make the more involved raw food recipes easier to prepare: a food processor, a blender, and a food dehydrator. (If you do not have a dehydrator, you can still make lots of the recipes that require one by using your oven on a low temperature. I would not recommend this for the recipes that require long hours in the dehydrator, but for shorter drying times – such as the burger recipe below – I think it would be just fine.) I do not have the other appliance that would round out the-well stocked raw kitchen: a juicer. When necessary, I get around that by purchasing fresh juice from one of our island natural food stores when a recipe requires it.

Earlier this week I was reading The Sunny Raw Kitchen and was intrigued by Carmella’s post about some jalapeño burgers she recently made. The recipe was originally posted here. I made some modifications to the recipe and my modifications to the recipe are posted below. She had paired her burgers with these avocado fries and I did not see reason to mess with a formula that seemed pretty sure-fire (and I happen to love avocado), so I made those, as well, and followed the recipe with no modifications.

To top off the burgers and avo fries, I made a simple mango salsa, which was absolutely delicious, and the recipe is also posted below.

Raw food is fresh, delicious, and great for you. I am impressed by raw foodists and chefs who do it so well because I think they exhibit a wonderful creativity and imagination in the kitchen. I am not going to be giving up my baked cupcakes or tofu anytime soon, but it’s all about a healthy balance, no?

For those of you who need further convincing on this whole raw food thing, just scroll down to see the raw carrot cake I made from Living Cuisine … absolutely divine, I tell you …..

Raw Burgers

2 cup walnuts, soaked for 4 hours
1/2 cup smoky sun-dried tomatoes, soaked until very soft, reserve 1/8 cup soaking water
1 small poblano pepper, finely chopped
1/2 onion, finely chopped
1 tbsp soy sauce
2 tsp Tandoori seasonings
Salt & pepper to taste

In a food processor, combine all ingredients and process until you achieve a thick, paste-like consistency. Be sure to scrape down the sides during processing to ensure that all ingredients are well incorporated. Remove from processor.

Shape into small patties. Place patties onto a teflex-lined dehydrator tray. Dehydrate at 115F for 2 hours. Flip the patties onto the dehydrator screen for an additional 2 hours.

Salsa

2 tomatoes, diced
1 mango, diced
1 green bell pepper, diced
1 clove garlic, minced
1 tbsp lime juice
1 tsp chili garlic sauce
¼ cup cilantro

Mix all ingredients in a bowl.

And dessert … delicious carrot cake:

Read Full Post »

This month I did not procrastinate on my Daring Bakers challenge.

I actually had an occasion early on in the month to make this fancy pants cake for friends, who all gave this recipe their very enthusiastic two thumbs up. Finally – I can swipe my hand across my forehead in happy relief that I was not rushing at the last minute to make a veganized version of a ridiculously complicated and dairy-laden dessert.

This recipe was originally a filbert gateau but, as usual, I wanted to put a tropical spin on the challenge so I replaced the hazelnuts and cointreau with macadamia nuts and coconut rum. The makeover was a success: the result was a cake that would fit right in at the luau!

This cake has lots of steps, but it can be done in one prolonged baking session. I promise you: the praline buttercream alone is reason enough to make this cake.

Thank you to Mele Cotte for hosting this month’s challenge!

Macadamia Nut Gateau with Praline Buttercream
From Great Cakes by Carol Walter

1 Macadamia Nut Genoise
1 recipe sugar syrup, flavored with rum
1 recipe Praline Buttercream
1 recipe Strawberry Glaze
1 recipe Ganache Glaze, prepared just before using
3 tablespoons macadamia nuts, coarsely chopped
12 whole macadmia nuts

Filbert Genoise

Because of the amount of nuts in the recipe, this preparation is different from a classic genoise.

1 1⁄2 cups macadamia nuts, toasted
2/3 cup cake flour, unsifted
4 Tbsp. cornstarch
6 tbsp canola oil
1 cup sugar
1 tsp. vanilla extract
1⁄2 tsp. grated lemon rind
¾ cup vanilla soy yogurt
1⁄4 cup warm Earth Balance

Position rack in the lower 3rd of the oven and preheat to 350 degrees. Grease and flour a 10” X 2” inch round cake pan.

Using a food processor, process nuts, cake flour, and cornstarch for about 30 seconds. Then, pulse the mixture about 10 times to get a fine, powdery mixture. You’ll know the nuts are ready when they begin to gather together around the sides of the bowl. While you want to make sure there aren’t any large pieces, don’t over-process. Set aside.

Use a hand mixer to mix together the canola oil, sugar, vanilla, lemon rind, and soy yogurt until well blended.

Pour the warm EB in a liquid measure cup (or a spouted container). * It must be a deep bottom bowl and work must be fast.* Put the nut meal in a mesh strainer (or use your hand – working quickly) and sprinkle it in about 2 tablespoons at a time and fold it in. Be sure to exclude any large chunks/pieces of nuts. Again, work quickly and carefully as to not deflate the mixture. When all but about 2 Tbsp. of nut meal remain, quickly and steadily pour the warm EB over the batter. Then, with the remaining nut meal, fold the batter to incorporate.

With a rubber spatula, transfer the batter into the prepared pan, smoothing the surface with the spatula or back of a spoon. **If collected EB remains at the bottom of the bowl, do not add it to the batter! It will impede the cake rising while baking.

Tap the pan on the counter to remove air bubbles and bake in the preheated oven for 30-35 minutes. You’ll know the cake is done when it is springy to the touch and it separates itself from the side of the pan. Remove from oven and allow to stand for 5 minutes. Invert onto a cake rack sprayed with nonstick coating, removing the pan. Cool the cake completely.

*If not using the cake right away, wrap thoroughly in plastic wrap, then in a plastic bag, then in the refrigerator for up to 3 days. If freezing, wrap in foil, then the bag and use within 2-3 months.

Sugar Syrup
Makes 1 cup, good for one 10-inch cake

1 cup water
1⁄4 cup sugar
2 Tbsp. dark rum or orange flavored liqueur

In a small, yet heavy saucepan, bring the water and sugar to a boil and simmer for 5 minutes. Remove from heat, add the liqueur. Cool slightly before using on the cake. *Can be made in advance.

Praline Buttercream
1 recipe Buttercream (I used the Fluffy Vegan Butercream Frosting from Vegan Cupcakes Take Over the World)
1/3 cup praline paste
1 1⁄2 – 2 Tbsp Malibu coconut rum

Blend 1⁄2 cup buttercream into the paste, then add to the remaining buttercream. Whip briefly on med-low speed to combine. Blend in rum.

Praline Paste
1 cup (4 1⁄2 oz.) Hazelnuts, toasted/skinless
2/3 cup Sugar
Line a jelly roll pan with parchment and lightly butter.

Put the sugar in a heavy 10-inch skillet. Heat on low flame for about 10-20 min until the sugar melts around the edges. Do not stir the sugar. Swirl the pan if necessary to prevent the melted sugar from burning. Brush the sides of the pan with water to remove sugar crystals. If the sugar in the center does not melt, stir briefly. When the sugar is completely melted and caramel in color, remove from heat. Stir in the nuts with a wooden spoon and separate the clusters. Return to low heat and stir to coat the nuts on all sides. Cook until the mixture starts to bubble. **Remember – extremely hot mixture.** Then onto the parchment lined sheet and spread as evenly as possible. As it cools, it will harden into brittle. Break the candied nuts into pieces and place them in the food processor. Pulse into a medium-fine crunch or process until the brittle turns into a powder. To make paste, process for several minutes. Store in an airtight container and store in a cook dry place. Do not refrigerate.

Strawberry Glaze
Good for one 10-inch cake

2/3 cup thick straewberry preserves
1 Tbsp. water

In a small, yet heavy saucepan, bring the water and preserves to a slow boil and simmer for 2-3 minutes. If the mixture begins to stick to the bottom of the saucepan, add water as needed.

Remove from heat and, using a strainer, press the mixture through the mesh and discard any remnants. With a pastry brush, apply the glaze onto the cake while the cake is still warm. If the glaze is too thick, thin to a preferred consistency with drops of water.

Ganache Glaze
Makes about 1 cup, enough to cover the top and sides of a 9 or 10 inch layer or tube cake

6 oz. (good) semisweet or bittersweet chocolate
6 oz. (3⁄4 cup coconut cream (place a can of whole fat coconut milk in the refrigerator for at least four hours. Skim off the cream and save the water for another use)
1 tbsp. light corn syrup
1 Tbsp. Malibu coconut rum
3⁄4 tsp. vanilla
1⁄2 – 1 tsp. hot water, if needed

Blend vanilla and liqueur/rum together and set aside.

Break the chocolate into 1-inch pieces and place in the basket of a food processor and pulse until finely chopped. Transfer into a medium sized bowl and set aside.

Heat the coconut cream and corn syrup in a saucepan, on low, until it reached a gentle boil. Once to the gently boil, immediately and carefully pour over the chocolate. Leave it alone for one minute, then slowly stir and mix the chocolate and cream together until the chocolate is melted and incorporated into the cream. Carefully blend in vanilla mixture. If the surface seems oily, add 1⁄2 – 1 tsp hot water. The glaze will thicken, but should still be pourable. If it doesn’t thicken, refrigerate for about 5 minutes, but make sure it doesn’t get too cold!

Assembling Cake

Divide the cake into 2 layers and place the first layer top-side down on your serving plate. Using a pastry brush, moisten the layer with 3-4 Tbsp. of warm sugar syrup. Measure out 1 cup of praline buttercream and set aside.

Spread the bottom layer with a 1⁄4-inch thickness of the remaining buttercream. Place the second layer over the first, brush with sugar syrup, spreading with buttercream. Gently, press the sides of the cake to align the layers. Refrigerate to chill for at least 30 minutes.

Holding a serrated or very sharp night with an 8-ich blade held parallel to the sides of the cake, trim the sides so that they are perfectly straight. Cut a slight bevel at the top to help the glaze drip over the edge. Brush the top and sides of the cake with warm strawberry glaze, sealing the cut areas completely. Chill while you prepare the ganache.

Place a rack over a large shallow pan to catch the ganache drippings. Remove the gateau from the refrigerator and put it the rack. With a metal spatula in hand, spread the ganache over the top and sides of the cake. Move the spatula over the top of the ganache about 4 times to get a smooth and mirror-like appearance. The ganache should cover the top and run down the sides of the cake. Let the cake stand at least 15 minutes to set after glazing.

To garnish the cake, use a pastry bag to pipe the remaining buttercream onto the cake. Starting 1⁄2 inch from the outer edge of the cake, position the pastry tube at a 90 degree angle with the top almost touching the top of the cake. Apply pressure to the pastry bag, moving it slightly toward the center of the cake. As the buttercream flows on the cake, reverse the movement backward toward the edge of the cake and finish by pulling the bag again to the center. Stop applying pressure and press the bag downward, then quickly pull the tip up to break the flow of frosting. Repeat, making 12 leaves evenly spaced around the surface of the cake.

Make a second row of leaves on the top of the first row, moving the pastry bag about 3⁄4 inch closer to the center. The leaves should overlap. Make a 3rd row, moving closer and closer to the center. Add a 4th row if you have the room. But, leave a 2-inch space in the center for a chopped macadamia nut garnish. Place one macadamia nut between each row of frosting along the cake’s edge. Refrigerate uncovered for 3-4 hours to allow the cake to set. Remove the cake from the refrigerator at least 3 hours before serving.

Leftover cake can be covered with foil and kept in the refrigerator for up to 5 days.

Read Full Post »

Coconut Rum Cake

Often times, people seemed surprised when they find out that I enjoy cooking and food magazines. As the majority of cooking magazines do not cater to a vegan audience, this surprise is well merited. In the true spirit of the DIY lifestyle, I enjoy a good challenge and most of the recipes in these magazines are just that: a tantalizingly delicious-seeming challenge. I like to tear out all of the recipes that intrigue me, file them away in my recipe binders, and have them at my fingertips for those days when I want to flip through them and satisfy my impulse to get experimental with dinner (which is most days, really …)

Last week we were fortunate to have our friends Kate and Chris honeymooning on Maui. When we had them over to the cottage for dinner one night, I wanted to serve something tropical and island style. After flipping through my desserts binder of torn-out recipes, I instantly decided upon a coconut rum cake that was featured in a 2007 issue of Gourmet Magazine (perhaps the most not-vegan friendly food magazine of them all …). It took a bit of tweaking, but this cake turned out beautifully. It was also deceptively easy to make, which only adds to the love.

For the coconut cream, I stuck a can of full fat coconut milk in the refrigerator overnight and skimmed the cream that rose to top out of the can. You can also just stick the can in the fridge in the morning if you are planning on making this later in the day.

Coconut Rum Cake
Adapted from Gourmet Magazine September 2007

Cake
1 ¼ cups flour
1 ½ tsp baking powder
¼ tsp salt
1 cup vanilla soy yogurt
3 tbsp canola oil
1 ½ cups sugar
1 tsp vanilla
1 ½ stick Earth Balance, melted and cooled
½ cup coconut cream

Icing
3 tbsp Tofutti Better Than Cream Cheese
5 tbsp coconut cream
1 tbsp dark rum
1/8 tsp vanilla
½ cup confectioners sugar

Coconut flakes

1. Preheat oven to 350F. Lightly oil and flour a 9” round cake pan.

2. Whisk together the flour, baking powder, and salt. In a separate bowl, whisk together the soy yogurt, oil, and sugar. Gradually whisk in the flour mixture until just combined. Pour into the cake pan and tap pan on counter to expel air bubbles.

3. Bake cake until golden brown and the cake starts to pull away from the side of the pan, about 45-50 minutes. Cool in pan in the oven for 10 minutes. Invert cake onto a rack and cool for 10 minutes more. Generously brush the top and side of the warm cake with the coconut cream, allowing it to soak in completely before brushing on more. Cool cake completely.

4. To make the icing, beat together the Tofutti, coconut cream, rum, and vanilla until smooth, and then beat in the confectioners sugar. The icing should be smooth and a little runny. Smooth the icing over the cake, allowing it to drip over the side. Top with coconut flakes.

Read Full Post »

This month’s Daring Bakers challenge was a L’Opera Cake, which features a cake made with 6 egg whites and 6 whole eggs. *Sigh* Daring Bakers, what are you trying to do to me? Make me throw my vegan lovin’ hands up in frustration and cry “Woe is me!”?

Ha! Not this gal. I happily accept your egg-laden challenge.

This is why I love these DB challenges. They push me to be a creative problem solver in the kitchen. I had never even heard of a L’Opera Cake before this month. This recipe looks very involved but I found it to be quite easy to complete. Here are the elements of a L’Opera Cake:

Joconde: The base of an Opéra Cake is a thin sponge cake that is made using nut meal, traditionally almond meal (finely ground blanched almonds).

Syrup: The joconde is flavoured with a sugar syrup that can be flavored to suit your tastes.

Buttercream: The first two layers of the joconde are covered in a rich buttercream.

Ganache/Mousse (optional): In some recipes, the final layer of the joconde is covered in a ganache or mousse. While not hard to make, this makes the recipe quite involved.

Glaze: The final step to an Opéra Cake is the glaze that gives the cake a very finished and elegant appearance.

I made some adaptations (of course) to both the recipe and the assembly. For my cake I decided to go with an almond, coconut, and berries flavor combination.  Here’s my play-by-play:

Saturday night: I made the jaconde by replacing the many eggs with a combination of soy yogurt, Ener-G “eggs”, and canola oil. I knew that I would not achieve a sponge cake with this recipe but I believed that I would accomplish a delicious almond cake, which was exactly what I ended up with. Also, instead of two cakes I made just one. I also made my syrup ( I chose coconut flavoring) and white chocolate (I used Bittersweet’s recipe to make my own).

Sunday early afternoon: I made my buttercream and I made my ganache/mousse. I used all of my white chocolate for this step and did note reserve any for a glaze, so out went the glaze from my recipe. Not a problem! I sliced up some berries to add to my layers. I assembled my cake and decided to leave it a bit rustic looking with rough edges (rather than smoothing them out for a more refined look) because I was planning on serving it as dessert at our Memorial Day Barbecue (the red, white, and blue look of the cake made it quite appropriate for the occasion).

The cake set up in the fridge for a few hours, and it was then served to great fanfare. The cake disappeared in a jiffy and some declared it a brand new favorite. I will definitely be making this DB recipe again. Big mahalos to Ivonne from Cream Puffs in Venice, Lis from La Mia Cucina, Shea from Whiskful, and Fran from Apples Peaches Pumpkin Pie for creating this challenge.

A Taste of Light: Opéra Cake
This recipe is based on Opéra Cake recipes in Dorie Greenspan’s Paris Sweets and Tish Boyle and Timothy Moriarty’s Chocolate Passion.

Jaconde

1 cup soy yogurt
2 tbsp granulated sugar
2 cups ground almonds (You can buy almond meal in bulk food stores or health food stores, or do as I did – make it at home by grinding almonds in the food processor with a tablespoon or two of the flour that you will use in the cake. The reason you need the flour is to prevent the almonds from turning oily or pasty in the processor. You will need about 2 cups of blanched almonds to create enough almond meal for this cake.)

2 cups icing sugar, sifted
3 Ener-G “eggs”
2 tbsp canola oil
1⁄2 cup all-purpose flour
3 tbsp Earth Balance, melted and cooled (plus a little extra for greasing the pan)

1. Preheat the oven to 425◦F.

2. Line one 12 1⁄2 x 15 1⁄2- inch jelly-roll pan with parchment paper and brush with melted Earth Balance.

3. In a mixing bowl, beat the soy yogurt and sugar together until smooth. Set aside.

4. In a second bowl beat the almonds, icing sugar, Ener-G “eggs”, and canola oil on medium speed for about 3 minutes.

5. Add the flour and beat on low speed until the flour is just combined (be very careful not to overmix here!!!).

6. Using a rubber spatula, gently fold the soy yogurt mixture into the almond mixture and then fold in the melted EB. Pour the batter into the pan and spread it evenly to cover the entire surface of the pan.

7. Bake the cake until it is lightly browned and just springy to the touch. This could take anywhere from 15 to 20 minutes depending on your oven.

8. Put the pan on a heatproof counter or trivet and run a sharp knife along the edges of the cake to loosen it from the pan. Cover it with a sheet of parchment or wax paper, turn the pan over, and unmold.

9. Carefully peel away the parchment, then turn the parchment over and use it to cover the cake. Let the cake cool to room temperature.

Syrup

1⁄2 cup water
⅓ cup granulated sugar
2 tbsp coconut cream

1. Stir all the syrup ingredients together in the saucepan and bring to a boil.

2. Remove from the heat and let cool to room temperature.

Buttercream
Adapted from Vegan Cupcakes Take Over the World

¼ cup nonhydrogenated shortening
¼ cup Earth Balance
3 cups powdered sugar
¾ tsp vanilla
¾ tsp almond extract
3 tbsp vanilla soymilk

Beat the shortening and EB together until light and fluffy. Add the sugar and beat for about 3 minutes. Ad the extracts and soy milk and beat for another 5-7 minutes, until fluffy.

White Chocolate Ganache/Mousse

7 ounces white chocolate
1 cup plus 3 tbsp coconut cream (put a can of full fat coconut milk in the fridge overnight and use the cream that rises to the top)
1 tbsp Malibu coconut rum

1. Melt the white chocolate and the 3 tbsp of coconut cream in a small saucepan.

2. Stir to ensure that it’s smooth and that the chocolate is melted. Add the rum to the chocolate and stir. Set aside to cool completely.

3. In the a mixing bowl, whip the remaining 1 cup of coconut cream.

4.Gently fold the whipped cream into the cooled chocolate to form a mousse/ganache.

5.If you’re not going to use it right away, refrigerate until you’re ready to use.

Assembling the Opéra Cake

(Note: The finished cake should be served slightly chilled. It can be kept in the refrigerator for up to 1 day).

1. Cut the cake into four equal squares. Line a serving plate with asquare of parchment or wax paper.

2. Place one square of cake on the parchment or wax paper and moisten it gently with the flavored syrup.

3. Spread about one third of the buttercream over this layer. Top with cut strawberries.

4. Top with a second square of cake. Moisten this square with the flavoured syrup.

5. Spread another third of the buttercream on the cake

and then top with blueberries. Place a third square of joconde on top of the blueberries. Wet the joconde with syrup, top with the remaining buttercream, place cut strawberries on top, and then place the final square of cake on top of the strawberries. Wet this cake with syrup and then refrigerate until very firm (at least half an hour).

6. Prepare the ganache/mousse (if you haven’t already) and then spread it on the top of the last layer of the joconde. Refrigerate for at least two to three hours to give the ganache/mousse the opportunity to firm up.

7. Serve the cake slightly chilled

Read Full Post »

When I was younger, I wanted to be Jewish.

My friends all attended Hebrew school in the evenings or on the weekends. Every summer they all went away to co-ed summer camp run by the Jewish Community Center. (I was shipped off every summer to an all girls’ Christian camp.)  My friends all attended JCC dances, and they all practiced and perfected their Hebrew for their Bar and Bat Mitzvahs.

All of my crushes wore yarmulkes.

It all started in the second grade when I was pulled out of Catholic School. The school I had been attending, St. Peter’s, was close to my neighborhood and my mom would walk me there and drop me off on her way to work downtown. I spent those years wishing I was Catholic, instead of Presbyterian. Presbyterian seemed so dull to me – no wafers, no wine, so mysterious little closet into which you would disappear and spill all of your secrets. Eventually, however, the wish to be Catholic was borne out of a sheer survival instinct. Once a week after religion class we would all be marched into the church adjoining our school, where we would be filled with the fear of hell fire and brimstone for our damned souls if we did not take communion, confirmation and confession to redeem ourselves. Once communion began, those few of us who were unfortunate enough to have not been born Catholic would be plucked out of the pews and sent back to an empty classroom to sit with an aide because this part of church was for Catholics only. There we would idly sit, waiting for those gaining redemption (or, more accurately, at that age watching others taking part in said redemption but were by association being redeemed, as well) to return to sit amongst us who remained sinners. I began to imagine my sins emanating from me like a bright pulsating light as I sat amongst all of my more pure classmates. As I began to get more and more concerned about our souls, public school suddenly seemed like a much preferable option to my mother.

Rather than enrolling me in the neighborhood public school, my mom camped out for several nights to secure me a spot in a magnet program at Linden Elementary, all the way across town. Each day my little short bus pulled up to my door in my gentile neighborhood of Fineview on the north side of Pittsburgh to take me to school in Point Breeze, which, with neighboring Squirrel Hill, was comprised of a large Jewish population. Straight away I became fast friends with Lena (who has made appearances on the blog in the past, such as here, here, and here) and we began to share our holidays with one another – I would make her little Easter baskets with chocolate eggs and wrap up trinkets in Christmas paper, and she would bring me Slush Puppies for Hanukkah (not particularly Jewish, to my knowledge, but delicious and appreciated, nonetheless) and flourless treats for Passover. I think she may have actually brought me matza one year, which eased the sting of having to eat chocolate bunnies instead of Passover fare.

This year, when I saw that Lena’s visit would occur during Passover, I couldn’t resist planning a vegan Seder. With Lena as consultant, we planned a menu of matzo ball soup, seitan pot roast brisket, and a flourless chocolate hazelnut torte. Lena was enthusiastically and adventurously on board with this plan; others, however, were a bit more dubious … which only added fuel to the vegan fire.

The matzo ball soup was made using the recipe from Vegan With a Vengeance, which is incredible – light, fluffy, delicious balls of matzo floating in a rich sea of vegetable broth. For the seitan recipe that is used in the pot roast brisket, I adapted Vegan Yum Yum’s adaptations of the now famous on the web Seitan O’ Greatness. Finally, for the chocolate hazelnut torte, I adapted a Passover dessert recipe of Martha Stewart’s.

I must admit that it was with slight trepidation that I served the seitan brisket. I felt fairly confident that it would turn out fine, but it really was a shot in the dark. Happily, it turned out better than fine – it was delicious, as was the torte. The brisket was so good that we packed it up the next day and took it on a picnic lunch in the form of sandwiches when we went upcountry to Kula to play frisbee golf.

I apologize for posting this Passover menu well after the fact this year, but be sure to bookmark this post and return to it for next year! (I also apologize for the subpar indoor photos .. there was no way to wait until the light of day to capture the moment!)

Seitan Pot Roast Brisket

4 cups vital wheat gluten
2 1/2 tsp salt
5 tbs nutritional yeast
2 1/2 tsp smoked paprika
2 1/2 cup water
5 tbs olive oil
2 1/2 tsp mustard
2 1/2 tbs soy sauce

1 yellow onion, sliced
8-10 red potatoes, diced
3-4 carrots, diced
5-6 garlic cloves
2 cups faux beef bouillon (I used Vegetarian Better Than Bouillon No Beef Base)
1 tbsp Italian herb blen

1. Preheat the oven to 375F. Mix the dry ingredients together until well combined. Mix the wet ingredients together. Add wet to dry and knead the dough for a few minutes. Let it rest for 3-5 minutes.

2. Form the dough into a pot roast loaf shape. Wrap the loaf up tightly in aluminum foil. Bake for 60 minutes. Remove and let cool.

3. Turn oven temperature up to 420F. Lightly spray a roasting pan (or, in my case, a large glass casserole dish) with cooking oil. Place seitan brisket loaf into the center of the pan. With a sharp knife, slice several shallow (appx. 1/2-3/4” deep) lines across the loaf for a more “realistic” brisket appearance.

4. Arrange the potatoes, carrots, onion, and garlic cloves evenly around the seitan loaf (its ok if some crown on top of it.) Pour the no beef bouillon over all of it, and then sprinkle with the Italian herb blend.

5. Tightly cover the dish with aluminum foil and bake until the vegetables are tender, appx 30-40 minutes.

6. To serve: arrange a slice of brisket on a plate with some of the roasted vegetables, spoon some broth over, garnish with salt, pepper, and parsley. Enjoy!

Chocolate Hazelnut Torte
Adapted from Martha Stewart’s Chocolate Torte with Passover Fudge Glaze

1 1/3 cups whole hazelnuts
3/4 cup Earth Balance, melted
3/4 cup cocoa powder, plus more for pan
1/3 cup matzo cake meal
¾ cup vanilla soy yogurt
1/2 cup packed light-brown sugar
Pinch of salt
1/2 cup superfine sugar

1 cup confectioner’s sugar, sifted
3 tbsp orange juice
1 tbsp melted Earth Balance

Flaked coconut

1. Heat oven to 350 degrees. Line a baking pan with parchment, and spread hazelnuts on top. Bake until fragrant and toasted, about 10 minutes. Place nuts in a clean kitchen towel, and rub to remove loose skins. Place 1/3 cup nuts in bowl of food processor, and pulse until finely ground; reserve. Roughly chop remaining 1 cup nuts, and set aside.

2. Lightly oil a 9-inch round cake pan with margarine; dust with cocoa powder and sprinkle in the chopped hazelnuts.

3. Whisk together remaining 3/4 cup cocoa powder, ground hazelnuts, matzo meal, and salt; set aside.

4. Use a handheld mixer to beat the soy yogurt and sugars together until well blended. Slowly mix in the dry ingredients until well incorporated.

5. Pour batter into the prepared pan and bake until a wooden skewer inserted in the middle of the cake comes out clean, approx. 35-45 minutes. Transfer to a wire rack to cool.

6. Prepare glaze by whisking all ingredients together and pour over the cake.  Cover with flaked coconut.  Slice and serve.

The next day: picnic lunch


Read Full Post »


 Another month, another Daring Bakers challenge. This month’s challenge was cake and, due to a hectic work schedule and then vacation (woo-hoo!) it came down to the wire for me this month and I baked this up at the last minute, unfortunately with no real reason for having a cake on hand. That means that Dan and I are currently staring at a very large party cake with equal parts delight and trepidation … just how is all of that cake going to get eaten? Tomorrow I will have to make the rounds and share some cake with the neighbors.

I had to make some adaptations to the recipe to make it vegan. For the cake I replaced buttermilk (with soymilk and cider vinegar), egg whites (with soy yogurt), and butter (with Earth Balance). The icing was a whole other challenge altogether: a merengue buttercream frosting. Oh my. The one thing I have not yet figured out how to veganize is merengue. Instead of spending hours pulling my hair out trying to figure out how to replicate merengue, I made a lemon buttercream frosting, toasted some coconut and macadamia nuts (becuase I live in Hawaii and have lots of them in the kitchen), and smothered the cake in the toasty goodness.

Overall, this is a very good cake. Dan immediately had a second slice, which is always a good sign as cakes can sometimes prove to be too overwhelmingly sweet for him. The taste is quite good ( I went with the recommended lemon cake and raspberry jam flavor combination), the texture is nice on the tongue, it slices well, and it is very pretty to look at. I would be interested in playing around with different flavor combinations as this cake lends itself well to improvisation. Maybe lime and coconut? Chocolate and raspberry? Chocolate and Grand Marnier? Vanilla and Kahlua? Vanilla and lilikoi? I could go on and on and on …


 Dorie Greenspan’s Perfect Party Cake

Cake
2 ½ cups cake flour
1 tbsp baking powder
½ tsp salt
1 ¼ cups vanilla soymilk + 1 tbsp cider vinegar
½ cup vanilla soy yogurt (or use lemon soy yogurt for a more intense lemon flavor)
1 ½ cups sugar
2 tsp grated lemon zest
8 tbsp Earth Blance, at room temperature
1 tsp lemon juice

Buttercream
5 cups powdered sugar
½ cup Earth Balance
½ cup shortening (I use Spectrum brand)
3 tbsp lemon juice

For Finishing
2/3 cup seedless raspberry preserves stirred vigorously or warmed gently until spreadable
1 ½ cups flaked coconut, toasted (to toast: place coconut in skillet over medium heat and toast for 3-5 minutes, being sure to keep the coconut moving so that it does not burn)
½ cup macadamia nuts, chopped and toasted (to toast, repeat process used for toasting the coconut)

To Make the Cake:

1. Center a rack in the oven and preheat the oven to 350 degrees F. Lightly grease and flour two 9 x 2 inch round cake pans.

2. Mix the cider vinegar with the soymilk and set aside.

3. Sift together the flour, baking powder and salt.

4. Whisk together the soymilk mixture and soy yogurt in a medium bowl.

5. Put the sugar and lemon zest in a mixer bowl or another large bowl and rub them together with your fingers until the sugar is moist and fragrant. Add the Earth Balance and, using a hand mixer, beat at medium speed for a full 3 minutes, until the EB and sugar are very light. Beat in the lemon juice.

6. Add one third of the flour mixture, still beating on medium speed. Beat in half of the soymilk mixture, then beat in half of the remaining dry ingredients until incorporated. Add the rest of the soymilk mixture beating until the batter is homogeneous, then add the last of the dry ingredients.

7. Finally, give the batter a good 2- minute beating to ensure that it is thoroughly mixed and well aerated.

8. Divide the batter between the two pans and smooth the tops with a rubber spatula. Bake for 30-35 minutes, or until the cakes are well risen and springy to the touch – a thin knife inserted into the centers should come out clean. Transfer the cakes to cooling racks and cool for about 5 minutes, then run a knife around the sides of the cakes, and turn them out onto the rack to cool.

To Make the Buttercream:

Beat together the EB and shortening until well mixed, light and fluffy. Then slowly add the powdered sugar and continue beating to mix well. Add the lemon juice and, finally, beat on medium speed for 5 minutes.

To Assemble the Cake:

Using a sharp serrated knife and a gentle sawing motion, slice each layer horizontally in half.

Put one layer cut side up on your cake stand or plate. Spread it with one third of the preserves. Cover the jam evenly with about one quarter of the buttercream. Top with another layer, spread with preserves and buttercream and then do the same with a third layer (you’ll have used all the jam and have buttercream leftover). Place the last layer cut side down on top of the cake and use the remaining buttercream to frost the sides and top.

Press the mac nuts into the center of the cake. Press the coconut into the frosting around the nuts, patting it gently all over the sides and top.

Read Full Post »

Giant Chocolate Chip Cookie Cake

I first caught wind of this culinary concoction at Culinary in the Desert.   I was in complete and utter awe of the thing and immediately resolved that it would be mine.  I then went to the source, veganized it, and happily paraded it into a room of unsuspecting people – all of whom reacted with wide eyes and mouths shaped into “O”s of wonder.  When I declared it was time to slice and serve the giant cookie cake, I turned my back on the room in order to cut the cake, and when I turned back I was faced with a line of eager people, forks and plates in hand.  Given the enormity of this cake – five layers of chocolate cookies with four layers of frosting – I was shocked that there was no cake left at the end of the party.
The original recipe called for heavy cream, which caused a moment of head scratching.  What in the world would a vegan use instead of heavy cream?  I usually just avoid recipes that call for it as an ingredient.  I decided upon coconut milk, which did the just the trick.  Be sure to only use regular coconut milk and not the lite version – what you’re after isthe fat (and c’mon: you’re making a giant cookie cake – it’s a little late to start worrying about calories!).  Just plan in advance – the coconut milk needs to be refrigerated for at least four hours before being used in this recipe.
Giant Chocolate Chip Cookie Cake
Adapted from Martha Stewart

Cookies
4 cups all-purpose flour
1 ½ tsp baking soda
1 ½ tsp salt
6 tbsp Earth Balance buttery spread, softened
1 ½ cups packed light brown sugar
¾ cup granulated sugar
3 teaspoons pure vanilla extract
½ cup vanilla soy yogurt
2 tbsp canola oil
¾ cup coconut cream (see directions below)
3 cups semisweet chocolate chips

Frosting
1 package Tofutti Cream Cheese
4 cup confectioners’ sugar
1-2 tbsp vanilla soymilk
1 tsp vanilla

1.    Preheat oven to 350 degrees. Whisk flour, baking soda, and salt in a medium bowl.

2.    Put Earth Balance and sugars into mixer bowl; mix on medium until pale and fluffy. Mix in vanilla, soy yogurt, and oil.

3.    Remove chilled coconut milk from the refrigerator and spoon out the thickened cream at the top of the can.  Reserve the coconut water for another use (I like to use it to replace some water when making rice).  Alternate adding cream and dry ingredients to the wet ingredients until everything is well incorporated.  Stir in chocolate chips.

4.    Trace an 8 inch circle onto a sheet of parchment paper.  For each of the 5 layers, drop 1 cup of batter onto the center of a baking sheet lined with the parchment (keep unbaked dough refrigerated) and use your spatula to spread the batter into an 8-inch circle.  Bake until edges are pale golden brown, about 18-22 minutes. Remove from oven.  Cool each giant cookie on a wire rack.

5.    For frosting: Mix Tofutti cream cheese, powdered sugar, and vanilla sugar in a medium bowl on medium-high speed until pale and fluffy, adding soymilk as necessary to achieve desired consistency.   Spread onto 4 cookies. Stack cookies, placing unfrosted cookie on top.   Enjoy!

Read Full Post »